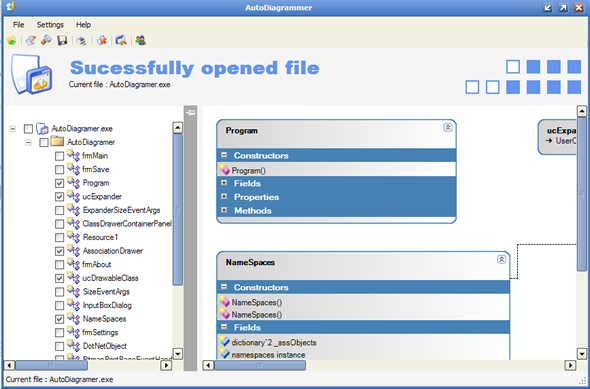
Class diagram generator for .NET assemblies


If your are working on a project and you need to see the overall picture of the solution you are working on, then you might first think about taking a look at the UML diagrams!

But if you only have the source code and some Visual Studio Express edition (Express Editions have no class diagram :( chipped with them), then looking for a tool to generate class diagrams for .NET assemblies will be your only option.

Although class diagrams are not too precise like UML diagrams, but they help too much in understanding classes relations and give you the picture of the solution.

There are many UML and Class diagrams generators for Visual Studio and .NET but most of them are not free.

Autodiagrammer is a free and open source tool that uses Reflection to generate class diagrams, it's pretty fast and give very useful results!
These are it's feautures :

AutoDiagrammer: Features

I have tried to make a useful product: to this end the following features are supported:

  • Detection of NON-CLR type being requested by user
  • Customization of what is shown on the class diagram
    • Show interfaces [Yes / No]
    • Show constructor parameters [Yes / No]
    • Show field types [Yes / No]
    • Show method arguments [Yes / No]
    • Show method return values [Yes / No]
    • Show property types [Yes / No]
    • Show events [Yes / No]
    • Show enumerations
    • Show delegates [Yes / No]
    • Number of columns to use for the generated diagram (Number between 1-5)
    • Class background start color
    • Class background end color
    • Class border color
    • Accessability modifier selection (Public only / Public and Static / All)
  • Automatically drawn class association lines
  • Automatically drawn generalization (inheritence) arrows
  • Expand individual sections of a class (Constructors / Fields / Properties / Methods / Events may all be collapsed / expanded individually)
  • Expand entire class
  • Class representation as similar to Visual Studio 2005 look and feel as possible
  • Allow saving of diagram to the following image formats (Bmp, Emf, Exif, Gif, Jpeg, Png)

So those are the main features. These will all be explained in more detail in the following sections

you can read more about how it works, and download it here : http://www.codeproject.com/KB/cs/AutoDiagrammer.aspx.

Posted in , |

CSS Tooltips

In order to show a tooltip [in a web page] you may think about using some dirty javascript tricks to show and hide Divs and such...
But there is other better solutions, and these of course are using CSS and some magic :)! the ideas is the same as doing menus with CSS.

Let's suppose we want tool tips for our links a on the page, the ideas is to add position:relative to the element you want to be tooltipe(ed) -a link in our case- so that we can allow the label inside our link to be positioned absolutely respect to the parent (the link).

this is the CSS :

a.tt{
position:relative; /*this is the key*/
z-index:24;
}

a.tt:hover{z-index:25;}

a.tt label{display: none}

a.tt:hover label{ /*the span will display just on :hover state*/
display:block;
position:absolute;
top:2em; left:2em; width:15em;
border:1px solid #0cf;
background-color:#cff; color:#000;
text-align: center}


you can see a live test by hovering around the subscription form above! (you may want to subscribe too :) )

original found here : http://psacake.com/web/jl.asp

Posted in |

Visual Studio 2010, subversion with AnkhSVN


SVN is a must have for managing projects and keeping them proper, with a history of changes, what should be done when 2 versions of the same file are changed and so on. It’s so important even for a developer working alone, since code will be never lost.

This post is a quick work through on how to install and use SVN on Windows and Visual Studio, you can read more about SVN here.

First, you should know that having a subversion client on Windows is sufficient, you can do all the stuff in there without the need to have it integrated with Visual Studio, but if you are like me, want perfect handling from within VS then you can go further to integrate it there as well.

We will use TortoiseSVN, a free Subversion client for Windows which integrates a cool shell menu to handle the different SVN commands, install it from here. Once installed you will notice a new shell menus.

1

After that, you have to create a repository (for guys who work on their machines). It is quite simple, you create an empty folder, this folder will be the location where all the history of the projects is saved, so make sure it somewhere safe.

Within this folder, right click and choose TortoiseSVN -> create repository here. Once created, you will notice the following contents added to the folder :

2

Now, you have to choose the repository structure, with whatever structure you want (see the recommendations for that here), right click the content of the directory and chooseTortoiseSVN –> import.

With a repository created and with a structure ready, you can start playing with projects from Windows explorer, for example create a Directory and inside it create a text file, then chooseSVN checkout, this will add the content to the repository

3

You will notice a little green bullet within the icon of the folder, which means the local content is updated compared to the content of the repository, let’s try something else, create a new text file inside that folder, then right click it and choose TortoiseSVN –> add to repository, this will make a little “+” sign with its icon, which means it’s ready to be committed. At this stage you will notice that the parent folder has changed to a red icon, which means it’s not up to date with the repository anymore.

4 5 7

Right clicking this file, choose SVN commit will bring this screen, where you can add messages to keep history of changes.

6
That’s generally how it works from within windows explorer, after the commit of this file, a new green icon will be back again to the parent folder, of course you can commit the parent folder and all the content will be committed, you can compare differences between local content  and the repository content and so on..
You will find all the commands within the shell menu, and they appear only on folders that you added to the repository, hitting shift + right click will bring more commands

8
Pretty cool, so what about Visual Studio?
Actually you can do the same from the Visual Studio 2010 (or other versions), from the document explorer precisely, there is a free plug-in called AnkhSVN found here

Once installed, it will bring Subversion functionality to Visual Studio, you can verify it’s installed well, and also configure some aspects from Tools –> Options –> Source Control


image

Create a new project, you will notice a little checkbox asking if you want add this project to Subversion or not, then you will get a parameters window where you can configure: the repository to use, the local folder and so on, I’m using a repository through http here, you don’t have to use only local repositories.

9 image

Everything is setup now, on the solution explorer you will notice the “+” signs on the contents, which means they are waiting for a commit to the repository, AnkhSVN bring the same functionality to the project explorer that TortoiseSVN brings to the shell menu (tip: AnkhSVN uses TortoiseSVN repositories, they are not the same), so you will notice the same, red, green icons as well, right clicking a file and choosing SVN –> commit will commit the file to the repository.

10

You can compare files before updating or committing by choosing Subversion –> Compare


11

There are dozens of other functionalities also, you can read more about TortoiseSVN and SVN in general from their website http://tortoisesvn.net/support

Posted in |

Visual Studio 2010, What's new

Finally, Microsoft is using it's technologies to develop Visual Studio, a pretty WPF application has arrived, it's Visual Studio 2010, for more technical news you can reffere here http://url.ie/1lia


and here are some screen shots from my first 2 minutes with VS2010


Posted in |

OCAML exceptions, a small tutorial

Exceptions are the best way to hundle errors in your code and decide what to do when your encounter one of them, if your have already worked with .net, java, python or a lot of other programming languages, you may already know what are exceptions and why they are out there, if you don't yet let's just see a small problem fo why exceptions are used!


consider the following function that returns the head (first element) of a list:
# let head l = match l with [] -> ??? | x::_ -> x;;
val head : 'a list -> 'a = <fun>

what would return this function when the list is empty []?
as a first solution we can use the type 'a option defined as follows :

type 'a option = None | Some of 'a

then the funtion head would be like the following

# let head l = match l with [] -> None | x::_ -> Some (x);;
val head : 'a list -> 'a option = <fun>

This function works well, but at this point we lost the function signature, we don't return the type of the list's elements anymore but the type option, which makes the code not the best way to go since OCAML is everything about types.

Exceptions :
In such cases exceptions are the best solution, and if you are not familiar with functional programming, you will see some magic here :).

conside the same function as before but using exceptions this time :

# let head l = match l with [] -> raise Not_found | x::_ -> x;;
val head : 'a list -> 'a =<fun>

As you see the function signature is exactly what we want (a beatiful polymorphic signature!). if we pass an empty list the function will raise the exception Not_found and if there is no hundler for the an exception (just bellow) the program will fail and stop execution.
If you are a good functional programmer you must be asking yourself: "What type is the expression raise Not_found"? as in general cases a function must have a single signature, which means the raise Not_found have the same type of x in the above example!

First lets see what is the type of the raise function, typing this in ocaml terminal reveals it :

# raise ;;
- : exn -> 'a = <fun>

As you can notice the raise function accept a exn type and return an 'a type, which means 
raise Not_found return an the polymorphic 'a type which totally is acceptable in the above function as you already know thanks to the OCAML generic types.
Exception have the exn type, and are declared with the exception keyword as follows

# exception My_exception;;
exception My_exception

and the type is exn as mentionned before :

# My_exception;;
- : exn = My_exception

We can also declare exceptions that accept arguments like the sum types do, but becarreful no polymorphic types are accepted in this context:

exception <name>
exception <name>  of <parameters>

# exception My_exception of int * int * string;;
exception My_exception of int * int * string

# My_exception (5,9,"exceptions are so cool");;
- : exn = My_exception (5, 9, "exceptions are so cool")

the exn type is so special in OCAML since it's a dynamic type, which means that when you declare a new exception you are actually adding it as a member of the exn sum type which already contains some default exeptions like Not_found, Failure ..., and because it's a sum type the first letter of the exception name must be a capital letter.

As we saw the raise function allow us to raise or throw (like .net people like to call) an exception, the execution stops immediatly in the point of the raise call and the excution flow goes immediatly to the first hundler for the specific exception, if no hundler is present the program breaks down.

handling exceptions:

The try ... with allow us to hundle exceptions like follows:

try with
Exception1 -> .....
Exception2 -> .... raise AnotherException
....
ExceprionN -> ...

Consider the following example :

# exception E of int;;
exception E of int
# let f x = if x=10 then raise (E 10) else 10/x;;
val f : int -> int = <fun>
# try f 10 with
  Division_by_zero -> 0
  | E x -> x;;
- : int = 10
# try f 0 with
  Division_by_zero -> 0
  | E x -> x;;
- : int = 0
# try f 3 with
  Division_by_zero -> 0
  | E x -> x;;
- : int = 3

As you can see the different errors are captured, and are very nicelly hundeled, this way you are sure your program will never break down because of some other unhundeled errors (as C programmers know and their ugly error hundling system).

A little test :D

Let's suppose we have a list that we want to calculate the multiply of all it's elements, and because wa want the best performance we want to stop when we encounter the first 0.

# let l=[1;6;3;7;2;0;4;7;.......................];;

A natural approach would be like follows:

let rec mult l=
  match l with 
  [] -> 1
  | hd::tl -> hd * (mult tl);;
val mult : int list -> int = <fun>

As you expect this would iterate all the list even when a zero is found, a simple workaround would be:
# let rec mult l=
  match l with
  [] -> 1
  | 0::_ -> 0
  | hd::tl -> hd * (mult tl);;
val mult : int list -> int = <fun>

This one do stop when the first 0 is encountered by will do the multiplying back of the elements found before anyway, means (0 * 2 * 7 * 3 * ....) so if 0 is in position 15 it will do 2*15 iteration.

As a last solution we can interrupt the execution with and exception, but here are two versions, can you tell which one is more accurate?

# exception Zero_found;;
exception Zero_found

version 1 :
# let rec mult l =
  match l with
  [] -> 1
  | 0::_ -> raise Zero_found
  | hd::tl -> try (hd * mult tl) with Zero_found -> 0;;
val mult : int list -> int = <fun>

version 2 :
# let mult l =
  let rec m lst =
  match lst with
  [] -> 1
  | 0::_ -> raise Zero_found
  | hd::tl -> hd * (m tl)
  in try m l with Zero_found -> 0;;
val mult : int list -> int = <fun>

Exceptions can also be used to speed calculations and interrupt itterator like List.fold_left...

The answer for the question above is : version 2 is the more accurate since it stops when the first 0 is found, but the first just skip one step when 0 is found and countinue the multimplying back, means (0 -here 2 is skipped because of the exception- * 7 * ....).

Posted in |

Project Euler, very clean, useful and fun

Yesterday I descovered one of the best websites out there, it's http://projecteuler.net.

As noted in the introduction of the project here :
Project Euler is a series of challenging mathematical/computer programming problems that will require more than just mathematical insights to solve. Although mathematics will help you arrive at elegant and efficient methods, the use of a computer and programming skills will be required to solve most problems.

It's about programming and mathematical problems, that you solve in your favorite language and submit them to the website to ckeck if your answer is correct and earn scores.

For me I decided to solve these problems in OCAML and C# using Linq, and guess what! My first answer using OCAML was right ;).

the first problem is the following : 

If we list all the natural numbers below 10 that are multiples of 3 or 5, we get 3, 5, 6 and 9. The sum of these multiples is 23.

Find the sum of all the multiples of 3 or 5 below 1000.

and this is my implementation in OCAML:

let gen_mult num max=

  let rec gen i=

  if i*num>=max then []

  else (i*num)::gen (i+1)

  in gen 1;;

let m3=gen_mult 3 1000;;

let m5=gen_mult 5 1000;;

let s3=List.fold_left (fun acc x->x+acc) 0 m3;;

let s5=List.fold_left (fun acc x->if x mod 3=0 then acc else x+acc) 0 m5;;

let result=s3+s5;;

have fun :)

Posted in , , |

Swedish Greys - a WordPress theme from Nordic Themepark. Converted by LiteThemes.com.