Take advantage of the new Windows 7 Taskbar #2 [Showcase : Bloginto7]

This is the part 2 of how to build a simple feed reader following the style of the Gmail Notifier Plus which uses basically the Windows 7 taskbar features.42001378_thumb
Part 1 was about the XAML part of the application, this part will show how to read the feeds asynchronously, how to change the ProgressBar and have an auto update features to read feeds.
First we need a prototype class to hold the feeds :

  1. namespace BlogInto_win7
  2. {
  3.     public class Feed
  4.     {
  5.         public int Id { get; set; }
  6.         public string Title { get; set; }
  7.         public string Link { get; set; }
  8.         public string PubDate { get; set; }
  9.         public string Author { get; set; }
  10.         public string Description { get; set; }
  11.         public string Votes { get; set; }
  12.     }
  13. }
Then we will need the following public variables to hold the feeds data, the current feeds shown and a timer for auto update.

Posted in , , , , , , , , , |

BlogInto, The First Google Chrome Extension For Bloginy

BlogInto has been around for a while as a standard Windows application or a Windows 7 specific version, today it is going public as a Google Chrome extension too.

It is so basic for now and it is the result of less than 2 hours playing around with the extensions’ APIs and specifications, if you want to play around with them too, make sure you take a look at the post about developing Google Chrome extensions I posted yesterday.

You can install it directly from here : https://chrome.google.com/extensions/detail/jppmcmbnmodlmgbfdddmeopgagancoak and of course the source code is public, you can view it using the Chrome developer tools –this is how to do it : [link]-.

Sans titre

Well,I hope you like it, and I would be happy to hear your feedback about any issues and problems with the extension, also any suggestions about features to include are welcome too.

2


Develop Google Chrome Extensions, SVN ‘em All Now

The buzz these days is all about Google Chrome extensions, you can check the directory of the available extensions here https://chrome.google.com/extensions/, you can even publish you own extensions on the same website.
If you want to develop for Google Chrome extensions, you will be so pleased if you already know JavaScript, the extensions are some sort of JavaScript pages (frames) that interact with a variety of APIs.
The Google Extensions website for developers on Google Code -http://code.google.com/chrome/extensions/getstarted.html- is really amazing (as all the other products explained by Google) and it’s too detailed and simple to follow and start getting your hands on the Chrome extensions.
After a while you will need to try out the examples they provide, and the best way is to checkout their ready-to-run samples using you favorite SVN tool, here I use TortoiseSVN for Windows and it’s working pretty cool.
In your favorite directory, right click in a free space and choose SVN Checkout.


Run you own web server using PHP / ASP.NET on IIS7 [Part #2 – Install Aquia-Drupal and Wordpress on IIS]

After part #1 about how to make your webserver available publically on the internet, I will discuss how to install php on IIS7 and how to run some known web applications on the same server.
There are 2 ways to install php on IIS, the first and the simplest one is to use the Microsoft’s Web Platform installer, you get the latest stable version of php and fastcgi configured, if you don’t know already, the Web Platform offers dozen of tools for developers, from Visual Studio Express, to database servers, IIS, php, webapps and more…
You can download the web Platform Installer from here 

The second method to install php  detailed here is to download php separately, then add a new script mapping and associate the extension you want to the php handler.

At the end, create a test page on the C:\inetpub\wwwroot directory –test.php for example- and copy this function inside, you have to add the current user to the owners of the directory in order to change or create files in it.

<?php  phpinfo();  ?>


Install WPA certificates (*.cer files) on Android

Installing custom certificates on Android was a real headache and a difficult issue for a lot of people, as for me, I was not able to connect to my university wifi because they are using a custom WPA certificate, you can see details about this here and other related problems with certificates and exchange server here.
The solution that I come over accidently was a small program on the Android Market called wifi helper, it supports :

    1. open wifi
    2. WEP
    3. WPA Personal
    4. WPA2 Personal
    5. WPA Enterprise
    6. WPA2 Enterprise
    7. LEAP
It’s pretty easy to use, and have a lot of advanced features also, I will show here how to use it with an open wifi that requires custom certificate file.
Trying to access the login page for the university wifi website gives the following :
device1 device2


Even selecting continue won’t make your device to connect to this network, so the solution is to download the certificate separately from your computer then upload it to you phone then configure Wifi helper like the following :
Choose Add new configuration –> standard mode then type the network name, in connection mode choose infrastructure, then in the wifi security choose the best that fits your situation, here I use WPA Enterprise, in my case the network wifi is open so I fill what ever in the Identity and Password, then comes the most important part where you choose the certificate file that you downloaded in the SDCARD.
device device3
device4 device5
Now with this set up, you can reconnect to the network and everything will work pretty well not just with the browser but all the apps that access this network.
device6


Using SVN With Visual Studio 2010

SVN is a must have for managing projects and keeping them proper, with a history of changes, what should be done when 2 versions of the same file are changed and so on. It’s so important even for a developer working alone, since code will be never lost.

This post is a quick work through on how to install and use SVN on Windows and Visual Studio, you can read more about SVN here.

First, you should know that having a subversion client on Windows is sufficient, you can do all the stuff in there without the need to have it integrated with Visual Studio, but if you are like me, want perfect handling from within VS then you can go further to integrate it there as well.

We will use TortoiseSVN, a free Subversion client for Windows which integrates a cool shell menu to handle the different SVN commands, install it from here. Once installed you will notice a new shell menus.

1

After that, you have to create a repository (for guys who work on their machines). It is quite simple, you create an empty folder, this folder will be the location where all the history of the projects is saved, so make sure it somewhere safe.

Within this folder, right click and choose TortoiseSVN -> create repository here. Once created, you will notice the following contents added to the folder :

2

Now, you have to choose the repository structure, with whatever structure you want (see the recommendations for that here), right click the content of the directory and choose TortoiseSVN –> import.

With a repository created and with a structure ready, you can start playing with projects from Windows explorer, for example create a Directory and inside it create a text file, then choose SVN checkout, this will add the content to the repository

3

You will notice a little green bullet within the icon of the folder, which means the local content is updated compared to the content of the repository, let’s try something else, create a new text file inside that folder, then right click it and choose TortoiseSVN –> add to repository, this will make a little “+” sign with its icon, which means it’s ready to be committed. At this stage you will notice that the parent folder has changed to a red icon, which means it’s not up to date with the repository anymore.

4 5 7

Right clicking this file, choose SVN commit will bring this screen, where you can add messages to keep history of changes.
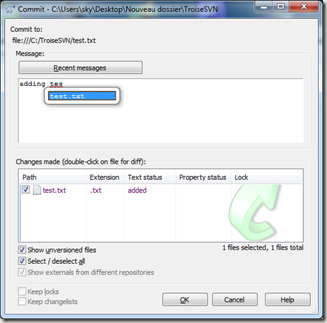
6
That’s generally how it works from within windows explorer, after the commit of this file, a new green icon will be back again to the parent folder, of course you can commit the parent folder and all the content will be committed, you can compare differences between local content  and the repository content and so on..
You will find all the commands within the shell menu, and they appear only on folders that you added to the repository, hitting shift + right click will bring more commands
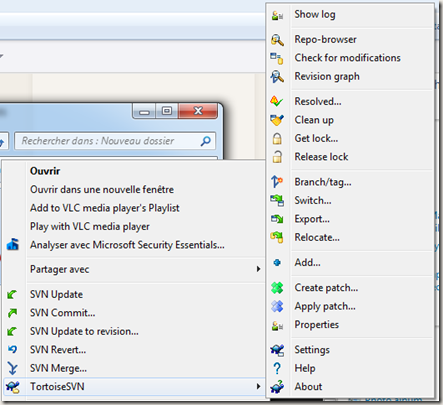
8
Pretty cool, so what about Visual Studio?
Actually you can do the same from the Visual Studio 2010 (or other versions), from the document explorer precisely, there is a free plug-in called AnkhSVN found here

Once installed, it will bring Subversion functionality to Visual Studio, you can verify it’s installed well, and also configure some aspects from Tools –> Options –> Source Control
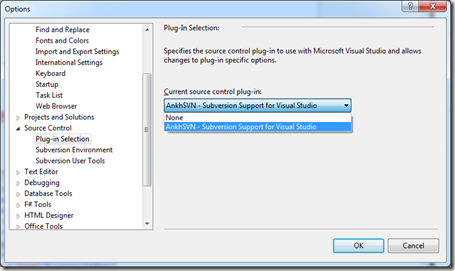

image

Create a new project, you will notice a little checkbox asking if you want add this project to Subversion or not, then you will get a parameters window where you can configure: the repository to use, the local folder and so on, I’m using a repository through http here, you don’t have to use only local repositories.

9 image

Everything is setup now, on the solution explorer you will notice the “+” signs on the contents, which means they are waiting for a commit to the repository, AnkhSVN bring the same functionality to the project explorer that TortoiseSVN brings to the shell menu (tip: AnkhSVN uses TortoiseSVN repositories, they are not the same), so you will notice the same, red, green icons as well, right clicking a file and choosing SVN –> commit will commit the file to the repository.

10

You can compare files before updating or committing by choosing Subversion –> Compare


11

There are dozens of other functionalities also, you can read more about TortoiseSVN and SVN in general from their website http://tortoisesvn.net/support

Posted in , , |

Swedish Greys - a WordPress theme from Nordic Themepark. Converted by LiteThemes.com.